Skyrim 100% LOTD
My setup for vanilla 100% LOTD including my settings.
Table of Contents
Before Starting
Pre Redownload
- NUKE ALL traces of skyrim, this includes where it is installed, do not just uninstall in steam and think it is gone, there will still be a folder left
- go delete your ini files for skyrim too in your documents/my games/skyrim
- we want a 100% fresh install on latest version with anniversary content, if you do not own anniversary GL
Files To Download
After Install
- Run the game, don’t bother changing any settings, just launch the game and get your anniversary content downloaded and then exit
Vortex
- Do the initial vortex setup and then create a new profile, tick it has its own saves, then enable the profile you just made
Extract Garbo
- Extract SSEdit, Bethini pie, Dyndolod, ACMOS Road Generator & XLODGen all to their own folders; ex; D:\ssedit D:\Bethini D:\Dyndolod etc
Bethini
- Run bethini, select skyrim special edition
- Under the basic tab, click Medium and then Apply recommended tweaks
- I have all 3 FOVs set to 90 but that is up to you
- Tick lock frame rate
- Under the gameplay tab, untick tutorials
- Under Visuals tab, untick Depth of Field
- Under View Distance tab, Change uGridsToLoad to 9 & Large Reference grid to 5
- click File and save, save all files it asks, then close bethini
SSEdit
Run SSEEditQuickAutoClean.exe do NOT run just SSEEdit.exe
tick update.esm then press ok, wait for it to fully finish, press the X up to right corner
Run SSEEditQuickAutoClean.exe again this time tick dawnguard.esm, wait for it to fully finish, press the X up to right corner
Rinse and repeat for Hearthfire & dragonborn & ccvsvsse004-beafarmer.esl
if you skip this part of cleaning master files dyndolod will fall flat on its face
Back To Vortex
- Install the pack inc optional files LINK
- Whilst it is installing, extract part 2 of engine fixes that you downloaded earlier to your skyrim directory
- After the pack has finished installing, download and install and enable this you want “SSE Terrain Tamriel Extend”
- In the dashboard for vortex, run Fores, tick “SKELETON Arm Fix”, then press update behavior and exit
- Then load bodyslide, under preset choose “CBBE Curvy (Outfit)”
- Click the first magnifying glass next to Outfit/body, Choose groups and tick “CT77 Remodeled - Transparent” & “KS Hairdos SML - Collisions (CBBE)” then press ok
- Tick “Build Morphs” next to batch build, then click batch build and then build, exit bodyslide when it is finished
- go back to the mods tab and purge mods, overwrite whatever it asks too, then deploy again
xLODGen & Roads
- Go into your folder where you extracted xlodgen too, right click and open terminal and run this command .\xLODGenx64.exe -sse -o:“D:\xLODGen\output” change the path to where ever your xlodgen is for me it’s D:\xLODGen and then put output on the end; ex; if you extracted to P:\modding\xlodgen you would run .\xLODGenx64.exe -sse -o:“P:\modding\xlodgen\output”
- Right click an empty area in the select world spaces column and select all
- Make sure Objects LOD, Trees LOD & Occlusion are all UNTICKED
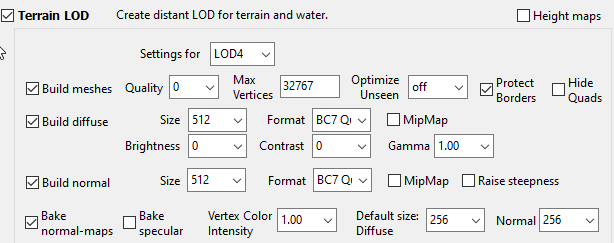
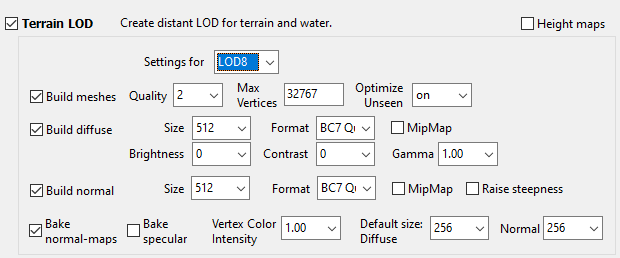
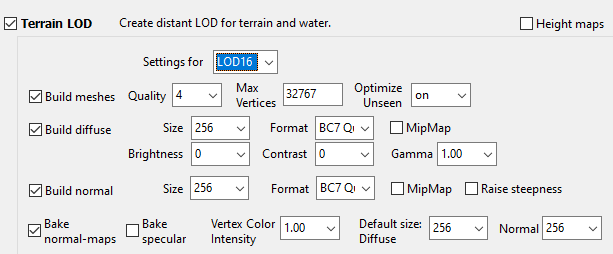
- Make sure your settings look like the pictures below for each LOD

- Then click generate, you can fuck off for 10 - 20 minutes depending on system
- When it is finished, close xlodgen and backup the output folder for a few minutes just in case
- Go into the folder where you extracted ACMOS Road Generator earlier and run it
- Under Path to LOD point it to where your output folder is for xlodgen, physically enter into the folder do NOT just point it at xlodgens directory, you might get warnings about being the output path just ignore it
- Change Paths Only to Roads and press generate, this might be where you get the warning about output path, just ignore it
- When it finishes, tell it to zip the contents up
- When the zip finishes, close ACMOS and navigate to your output folder, rename the zip to xlodgen_output.zip
- Drag it into vortex and install it/enable it
- Delete SSE Terrain Tamriel Extend, it is no longer required
- Purge your mods & Deploy
TexGen
- Go into where you extracted Dyndolod
- Run TexGenX64.exe, select SSE and then start texgen
- You want your settings to look like this, obviously your output path will be different

- Press start, this won’t take too long but when it finishes press zip & exit
- Navigate to your output folder, and import/install/enable the zip in vortex
- Overwrite everything it conflicts with
- Purge & Deploy again
Dyndolod
- Go into where you extracted Dyndolod
- Run dyndolodX64.exe, select SSE and then start dyndolod
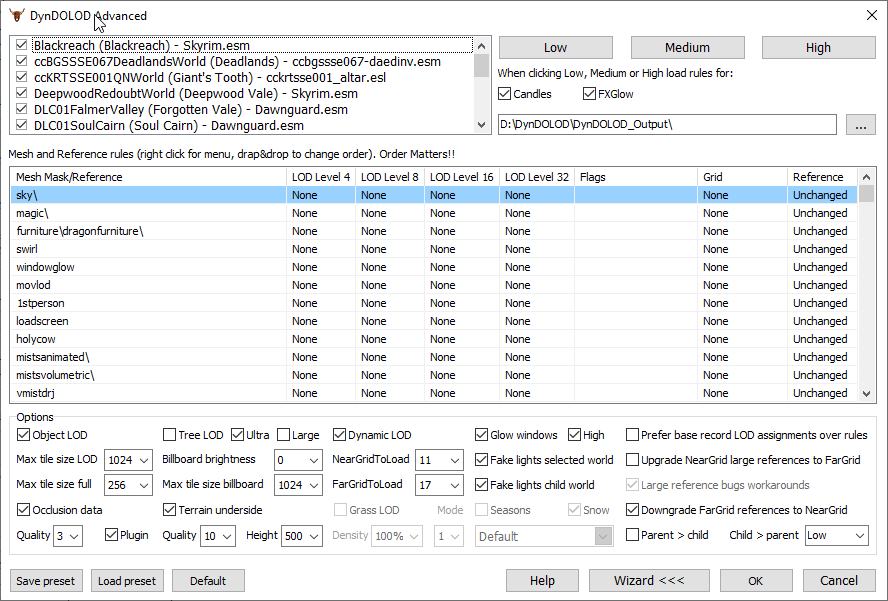
- When it finishes initialising just press Advanced »>
- In the top left box if they are not already all select, right click select all
- Under “Low Medium High” there is 2 tick boxes called “Candles” and “FXGlow” make sure they ARE ticked and then click high
- After that make sure all your options down the bottom of dyndolod match mine
- After that click ok, you can then go away for quite some time it will take ages
- when it is done, zip & exit
- Navigate to your output folder, and import/install/enable the zip in vortex
- Overwrite everything it conflicts with (it might not)
- Purge & Deploy again
Reshade
- Download this you do NOT need the one with full addon support
- Download my presets here or find your own
- Extract my presets to your skyrim directory where you previously extracted part 2 of engine fixes to
- run the reshade installer, tell it where the skyrim directory is, leave it on the directx version that is selected
- when it comes to installing shader files, browse to the brdi.ini you extracted and it will only install the ones my preset uses
- run the game, change hotkeys or whatever, doesn’t matter if you don’t, my preset will already be activated